I’m back in the Twin Cities today, working with Northern Brewer. As usual it’s a busy time: meeting with folks, talking about new products, projects, sales, marketing and all the great stuff that goes into being the world’s best supplier of consumer wine and beer making equipment.
I picked a fabulous time to visit. The weather has been spectacular, with temperatures hitting 20C (low 70’s) and bright sunshine. Even the flight in was auspiciously pretty.
Never get tired of watching the world go by.
I’ve got a Q&A session with the folks in retail this evening, and they’ve come up with a great list of questions. It’s really the best part of my job, talking to folks about making their own wine, and seeing a really pertinent leading question down on the page is like reaching into the pocket of a coat and finding a $20 bill you forgot you had.
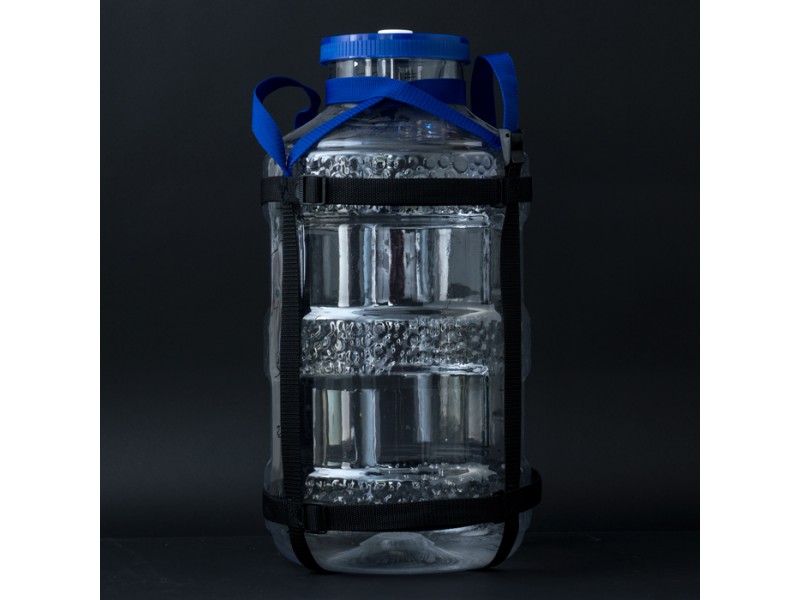
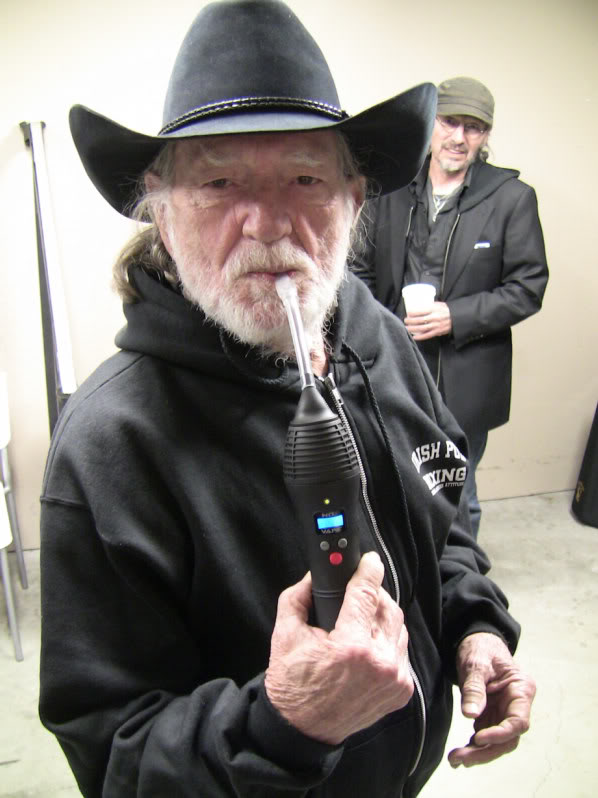
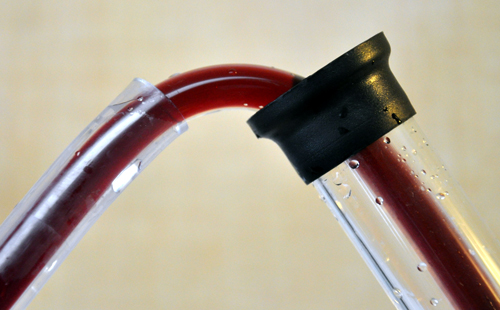
Strapped in and ready for use
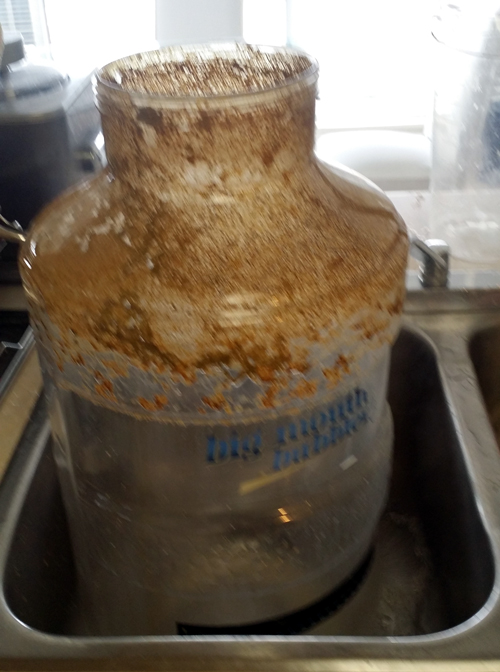
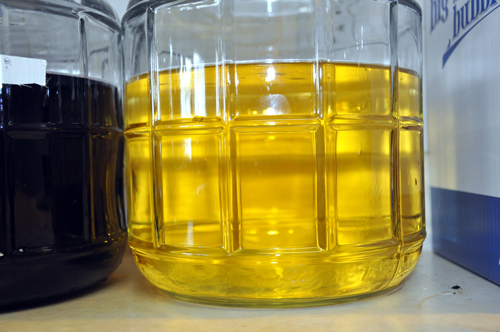
I’ve been meaning to give a shout-out to Northern Brewer for a while on the Big Mouth Bubblers that I got earlier this year. The idea of a PTFE fermenter with a gasketed lid that takes a bung and airlock seems fine, but when you use one for something that’s really messy, their usefulness snaps into clear relief.
I brewed a very hop-heavy IPA and when it finished fermentation, it looked like this:
Oh those dirty rings!
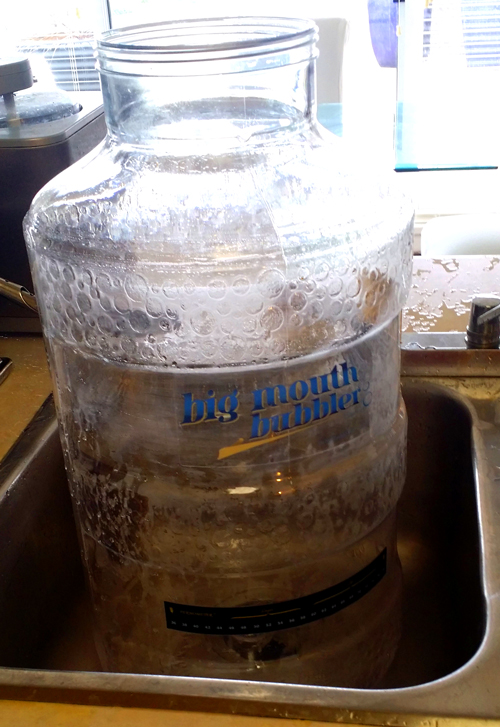
That looks like a terrible job of scrubbing, but with the wide-open top, even a moose with bulky arms like mine can easily stick his mitts right to the bottom and get a good scrub on. What would have taken a long soak for a carboy and the application of a brush and plenty of awkward gyrations to get all the goop off, only took 60 seconds with a soft cloth and some brewing detergent.
Shiny as a new penny
It’s got a bunch of condensed steam on it, but trust me, that Big Mouth Bubbler is as clean as a whistle. I’m replacing all of my fermenters with them, because I can’t visualise ever wanting to lug around and wash narrow-necked carboys again.
Off for Q&A, and tomorrow video shooting and more fun times.
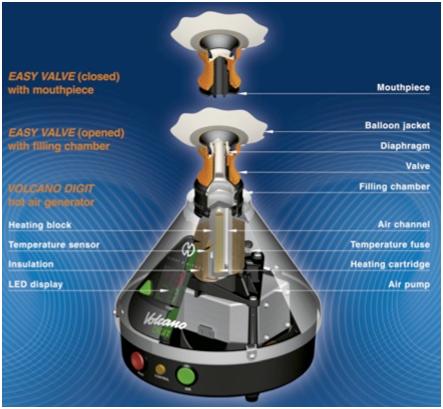
Conjectural Technology Laboratories, a division of Tim Vandergrift Worldwide, is excited to announce the ultimate kit winemaking product, one that will revolutionise both the the use and the appreciation of wine. A decade of research and development has produced the ultimate device for detecting and defining the most subtle nuances of wine, the Beverage Vaporiser.
The Beverage Vaporiser system (also known as the Volcano for it’s cone-shaped appearance) allows the user to
Drink wine as young as 10 days old
Taste 100% of the nuances of any wine, regardless of type or quality
Identify not only grape variety and style like a wine professional, but even to name the terroir, region grown and even the vineyard, with no training or study!
System shown: red wine vaporiser, white wine vaporiser and two Vaporbotas.
“The concept is actually very simple”, says Dr. Ann Credulous, Director of the Conjectural Technology Lab for Tim Vandergrift. “Wine is a solution of organic compounds, with many volatile fractions–esters, ketones, aldehydes, thiols, monoterpenes, pyrazines, etc. For the most part The majority of volatile compounds responsible for aroma combine with sugars in the wine to form odorless glycosides. Through the process of hydrolysis, caused by enzymes or acids in the wine, they revert into an aromatic form. The act of tasting wine is essentially the act of smelling these vaporized aroma compounds. What we have done is found a way to duplicate the hydrolytic process that releases these aromas with tuned heat and vibration in a volatizing chamber.”
While the concept is simple, the results are anything but.
“Olfactory receptors cells, Dr. Credulous continues, “Each sensitive to a different aroma, pick up these compounds and transfer the information to the brain by way of the olfactory bulb. In the 1980s there was renewed focus in studying the correlation between aroma/flavor compounds in grapes and the resulting quality of wine. Scientists were able to use chromatograph-mass spectrometers to identify volatile aroma compounds in various grape varieties. It was our research into the action of the gas chromatograph chamber action that lead to the discovery of induced hyrdrolysis.”
Hydrolysis Chamber not shown for security reasons.
The Beverage Vaporiser works like this: the wine to be sampled is loaded into the Volcano and is put through the patented Chromatographic Hydrolysis Chamber. There, through a tuned system of temperature, resonance frequencies and aetheric distribution algorithms, the wine is turned into a richly textured, intensely flavourful vapour. Inhaled gently, this vapour reveals every aromatic compound and every bit of the bouquet and nuance of your wine. According to Credulous, that’s the key to identifying wine like a pro.
“By extracting and concentrating all of the aromas of wine in a small volume, they’re more pronounced. Anyone who has ever struggled to identify a particular character in a wine will be able to instantly smell blackberry in a Cabernet, or cat urine in a Sauvignon Blanc! Using pre-set algorithms in the Volcano, wines will release aromatic profiles identical to famous wines and vintages, from ’47 Mouton to 2001 Screaming Eagle. Training your palate has never been easier!”
And there’s more. According the Director of Customer Experience William Nelson,
“Because we tune the precise type and quantity of volatiles that are released, we ensure that only the finest, richest aromas come out. We can make an inexpensive or very young wine release the same aromatic character of a first-growth or Premier Cru wine that’s been aged for years, even decades.”
Director of Customer Experience, William Nelson (above) demonstrates prototype portable beverage vaporiser at the Montana Cattlemen’s Wine and Steer Show.
“But that’s only the beginning: because ethanol is a volatile compound we can suppress the hydrolisation frequency of alcohol in the machine–the vapour is as delicious as wine, but won’t lead to intoxication or drunkenness! The whole point of wine appreciation is to identify the character of a wine, to appreciate it for itself. By eliminating the effects of alcohol on the nervous system we can extend that pleasure indefinitely, and consumers can use as much wine as they want, without introducing toxins into their body or straining their liver.”
Ease up off that Cotes du Rhone, chum!
Of course, consumers can set the machine to deliver ethanol if they wish, by selecting the correct menu item on the touchscreen and agreeing to the End User License Agreement.
While there are plans for several types of vaporisers, including the portable prototype shown above, the Volcano is the first wine ‘Vape’ being launched and is highly suggested by dragonvape.ca. The Volcano Classic quality is first rate, and the build quality is incredibly durable: it’s made by a German company, Snortzen-Pickel, who offer a 3 year warranty standard on every purchase. Both the aromatic tuning and chamber size are adjustable to suit your needs–it can vaporise up to three litres of wine at one time, allowing you to serve two dozen guests easily.
Dr. Credulous in front of the first Beverage Vaporiser prototype.
The Beverage Vaporiser Volcano will be available in late September, timed to use in conjunction with the 2015 harvest. “We’re extremely proud of this product,” Says Ann Credulous, “Drinking wine is now a thing of the past–and rather than just sniffing a vintage like cavemen, we can literally inhale every drop!”
It’s been over a month since I posted to this blog. In social media terms, I might as well have left on a voyage for the new world and been captured by Barbary pirates and written off for lost, mourned only by creditors and a disgruntled cat, forgotten by time and tide.
I was originally taking a two-week break to go to Mexico, in order to soak up some Vitamin D (aka, ‘lay in the sun’) and local culture (aka ‘Tequila’). I did that and had some fun, but felt a little off the second week of the trip and by the time I got home, I had a cold.
Only no, it was a case of the H3N2 influenza. In popular culture a lot of folks equate a bad cold with ‘the flu’–I’ve probably been guilty of that myself. But the truth is this: if you can get out of bed, you don’t have the flu. Between a fever that ran over 102F for the better part of a week and the constant feeling that I needed a good solid night of sleep every time I woke up, I was off my feet for a week, recovering for two more and (oh the horror!) I completely lost my sense of smell and taste for nearly a month!
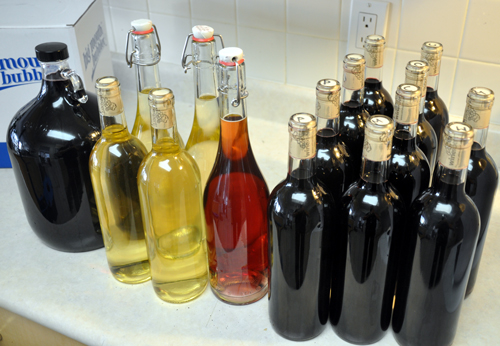
All the happy bottles!
Happily, that’s all behind me now, so I can get back in the saddle. I’m going to be tasting my Master Vintner series wines! They’re still very young but will have calmed down from bottle shock and be showing their true character.
I’m also hard at work on new projects with my friends at Northern Brewer, so I better get crackin’, and let the disgruntled cat and the Barbary Pirates know that I’m back amongst the living.
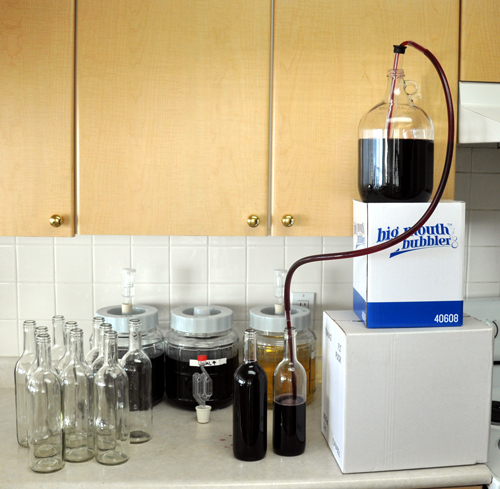
My first step was to clean and sanitise all of the equipment I’d be using, including my autosiphon, bottle filler, jugs and such–as always, cleanliness is next to goodliness in winemaking.
Next, I set up my racking station by the simple expedient of lifting my Little Big Mouth Bubbler on top of a convenient box on my counter. If you haven’t used one of the Master Vintner Small Batch kits yet, it’s hard to convey just what a joy this is. I’m old-school in many ways, having started off making wine in lots anywhere between 23 litres (6 US gallons) and 650 litres (three 60-US gallon barrels) at a time. With truly huge amounts you need a pump to move the wine around. A standard kit wine batch of 23 litres isn’t nearly as demanding, but lifting full carboys from one shelf to another, or putting them up on a high place so you can rack the wine down into a clean carboy on the floor (which then needs to be lifted back into the winemaking area!) starts to wear on the lower back after a few thousand batches. At only a single gallon, you can easily lift the Small Batch kits onto a convenient box or shelf above your kitchen counter, just as easy as getting a gallon of milk out of the refrigerator!
Once the fermenter was in place I racked the wine off of the sediment. Doing this is really helpful, since there’s a decent chance that the siphon will disturb sediment from the bottom of the carboy while your moving the hose from bottle to bottle. Rather than risk getting cloudy wine, it’s better to move all of the clear wine into a new vessel in one go, and then you can relax from there.
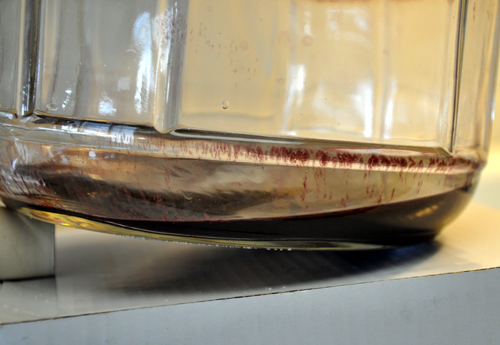
Note the siphon rod carefully placed on the far side of the fermenter–this will be important as we get to the bottom.
When the wine gets down to the bottom, the level of sediment needs to be carefully monitored. Remember, the point of racking is to get 100% of the clear wine and leave the muck behind, so don’t leave any of that delicious grape nectar behind.
A careful tilt keeps the end of the autosiphon in the wine.
To get and keep that tilt hands-free I usually improvise some kind of prop or wedge. Because I was making wine in my kitchen (another thing Small Batch Kits makes easy!) my carboy wedge wasn’t around. No matter: I just popped a bung under the front of the carboy and watched the levels as they dropped.
Never leave a man, uh, a drop of wine behind.
Just to make sure I was being completely efficient in my racking, I measured the amount of sediment left in the bottom of the Little Big Mouth Bubbler after it racked over. It came to just over couple of tablespoons all in all–which meant I was going to get a total of about 3.75 litres out of my US gallon (3.78 litre) batch, meaning I could fill five bottles, which is exactly what I wanted.
The wine was exceptionally clear on racking.
Limpid and gorgeous.
I could have bottled it right there, but since this was an actual test batch for quality assurance and proof of concept purposes, I pulled out my Buon Vino Minjet filter. Filtering doesn’t actually clear a wine: that’s what fining agents are for. Clearing polishes a wine so that it sparkles with a brilliance like diamonds. A former colleague had the best analogy for wine filtering: it’s the difference between a freshly washed car and a freshly waxed car. Both look great, but your eyes can instantly tell which car was waxed and polished because it glows. Same with wine.
Now that’s shiny!
It’s easy to see this in white wines: you could read the fine print of an EULA through that Chardonnay!
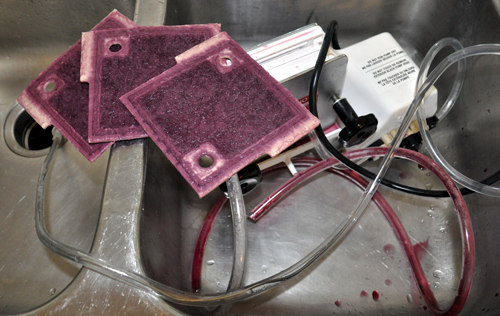
I got all four batches of wine through a single set of Buon Vino #3 pads in about 20 minutes, including sanitising and prep, going from the Chardonnay to the Pinot Noir, then the Merlot and finishing with the Cabernet Sauvignon. Yet another bonus feature of the Small Batch kits: you can make four of them and only need the tiny, convenient BV mini, rather than a much larger filter.
Rest, little filter: you’ve done a man’s work today.
While larger filter systems need a washtub or a laundry sink for cleanup, the Minijet is kitchen sink-friendly for cleanup. Note that the colour you see on those filter pads isn’t anthcyanins (grape pigment) stripped from the wine. It’s suspended material from the wine itself, stained by those pigments. That suspended material, principally yeast cells and colloids, would eventually settle out of the wine on its own. Even though the unfiltered wine was perfectly clear to the eye, after a year or two in the bottle a bit of colour would deposit out on the side or bottom of the bottle. Hurrah for filtering!
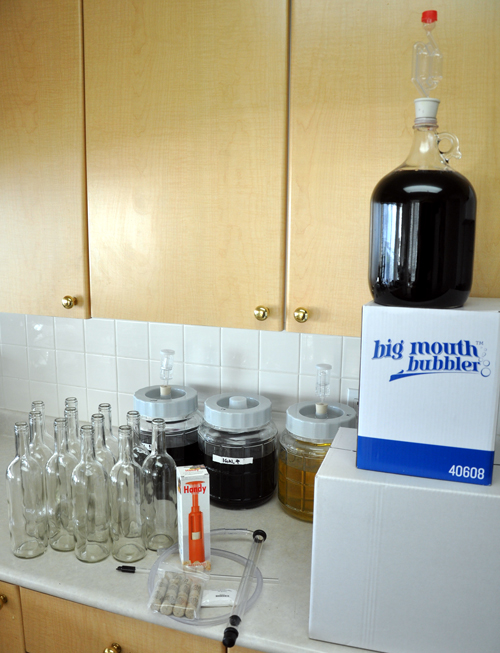
Next up, time to fill my wine bottles. I had a mixture of standard wine bottles in Flint (clear) and some swing-tops, also in clear. I like using swing tops for wine that’s going to be analysed and/or destroyed in testing–not because of any technical superiority of swing tops, but because I can never seem to find a dang corkscrew when I’m in the wine lab.
Bottles, autosiphon, siphon tip, impact corker, corks and sulphite for sanitising the bottles.
Also shown in the picture above is the Handy corker. It uses a plunger and a compression sleeve to press-fit the corks into the bottles.
Takes a little oomph, but works great.
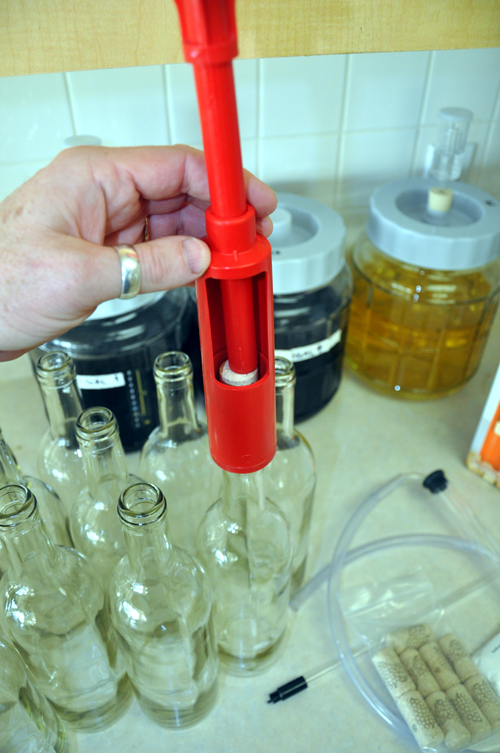
Because of the forces involved, it’s a good idea to use the (included) #8-sized corks and soak them in a bit of warm water before use. While I’ve used the Handy and it’s a fine unit, I had another plan in mind for my bottles. But first, I had to fill them.
Fast, clean and efficient–now that’s good winemaking!
Getting the bottles filed without splashing, spilling or endlessly fiddling to get the right fill level (very bottom of the neck, to leave the width of two fingers below the bottom of the cork) used to be a drag, but a siphon filler (included in your equipment kit!) makes it a snap.
The one-way needle valve on the tip of the rod stops the flow of wine as soon as you pull it up, while the volume of the rod displaces exactly the right amount of wine–when you fill the bottle to the top and then pull the rod out, the level of wine is perfect to accommodate a cork!
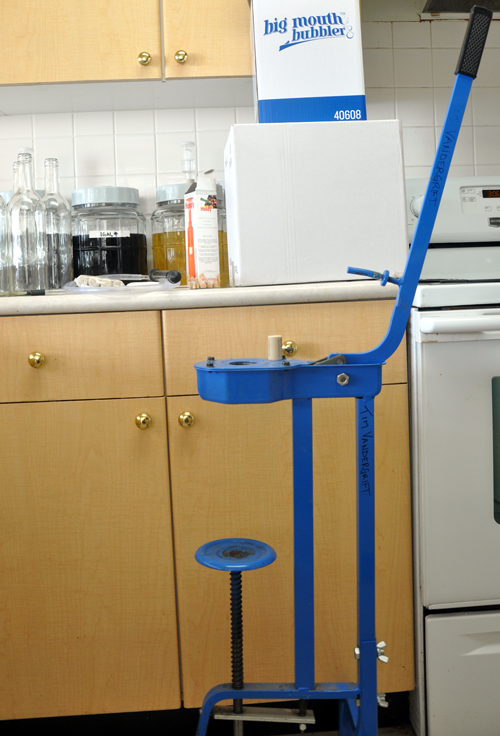
With the bottles filled, it was time to put corks in. My alternate scheme was to use my Italian bronze-jawed floor corker. This mighty beast has been my faithful companion for 25 years and tens of thousands of bottles of wine.
Industrial Age technology at its finest.
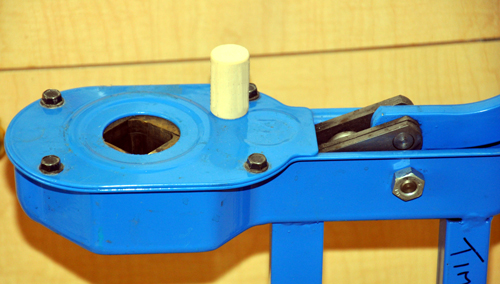
The key to how well this thing works is in the amount of leverage it can bring to bear, and how cleverly it compresses and inserts the cork into the bottles. The heart of the matter is the set of bronze jaws. Not brass–brass is too soft, and corks would wear it away in a short time, and this bronze is the same stuff they make steamship propellers out of.
You’re in for a squeezy time, Mr. Cork.
The jaws move as the corking arm is pulled, squeezing the cork down to just slightly larger than the size of a pencil. When it’s at is tiniest, the cork finger comes down. pokes it into the bottle and you’re done.
It’s as easy as that, every time.
After only a few minutes all of the bottles were filled, corked and swing-capped.
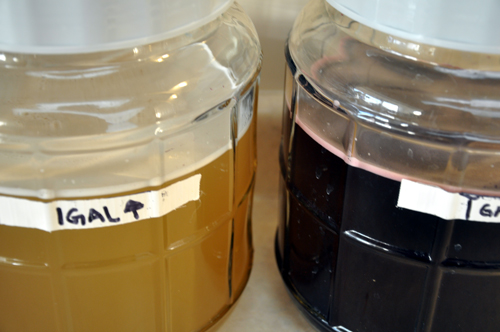
Say, what’s with that pink wine?
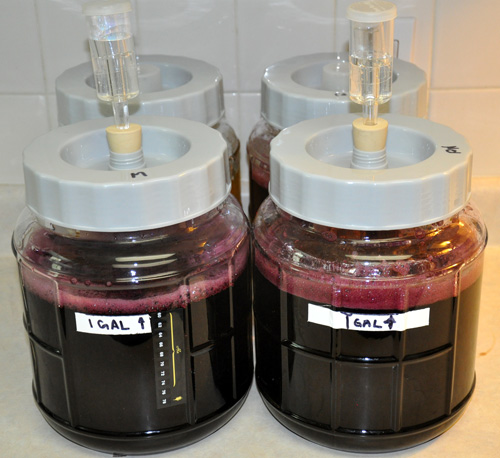
Astute observers will notice that there are 15 bottles, a gallon jug and one bottle of pink wine, which doesn’t match up that well with the whole four batches of five bottles each motif I started with. The gallon jug is a blend of Cabernet Sauvignon and Merlot. I blended it at a rate of 3:2, Cabernet to Merlot, after a few benchtop trials. I’m going to let it marry in the jug for a month or so and taste it before bottling.
The pink wine is slightly notional on my part–it’s my job to do the weird stuff so you don’t have to. Or, more accurately, so I can explain it when you do it without my knowledge! It’s a blend of 4% Pinot Noir into the Chardonnay. That kind of blending is a standard technique in commercial winemaking, and I was curious to see how it would marry up with a little time in the bottle.
How does it taste? Even though it’s very young, it’s everything I’d hoped: good fruit, varietal character, smooth tannin, balanced acid and a long finish, especially for a wine just in the bottle. I’m going to do a more formal taste-test in another three weeks, and then once a month after that to see how it’s progressing.
I’ve already ordered another four kits–I’ve never made wine with so little effort or mess, and I’m going to keep production up. Heck, it’s no more work than keeping a vase of flowers on the counter, with the added bonus, it’s wine!
It’s an old saying in the restaurant industry that diners eat with their eyes first. I always thought this would make spicy food vastly less appealing, but I learned that it’s a metaphor for how perception informs reality: if you think something is going to taste good, it’s going to taste good to you. Seems clear enough, but here’s the kicker: apparently we actually drink with our preconceived notions and our expectations.
Free? I’ll take two!
In a 2003 study by Dr. Brian Wansink of the Cornell Food and Brand Lab, diners were given free glasses of wine with their meal. Some were told it was a French wine, others were told it was a local (North Dakota) bottle. It was, in fact, Two-Buck Chuck in both cases. But the people who were shown a French label ate more dinner, and rated the food higher. Those who thought they were getting ND wine ate less and rated the meal ‘average’. Same wine, same food, different perception.
This really struck me, because over the years I’ve had a lot of calls from retailers asking for help finding a particular kind of wine for a customer. Typically they’ve had a bottle of wine on a vacation, or in a great restaurant somewhere, and they’re looking for a wine kit closest to it in flavour and aroma. I have to suppress feelings of despair at these calls, not because we don’t have something that’s stylistically close to the wine (we might even have a kit that’s nearly identical, or can be made so with a little tweaking) but because it isn’t the wine that they want to replicate. It’s the experience.
The wine tasted like crisp air, beautiful mountains, and fresh powder . . .
It’s even worse when the retailer starts off with, ‘They just got back from Switzerland . . .’. Typically the people were sitting on a patio on Lake Geneva, or in a ski lodge in Gstaad, and they had a wonderful white wine called ‘Fendant’. Fendant is the Swiss name for Chasselas, a grape with long history and short flavour. It’s slightly citrusy and the best examples hint at grassiness, but mostly it’s really, really neutral (hah, Swiss wines taste neutral, who would’a thought?) which is to say, bland.
But the folks were in the mountains, in a wonderfully well-organised, clean country, enjoying the fresh air and perhaps some wonderful cheeses, at peace with themselves in the center of a grand and magnificent setting. They could have been drinking lighter fluid and would have enjoyed the bouquet and ordered a second bottle. Many times people will bring a bottle home and when they open it, find it very disappointing. This is the origin of the phrase, ‘It doesn’t travel well’ . That actually means, ‘I couldn’t bring the setting and the experience home along with the wine.’
What’s good wine? It’s any wine you like, no matter it’s price or what other people think of it.
What to do? Nothing, really. There isn’t anything wrong with letting a whole experience wash over you, having it enhance your perceptions. One of the most incredibly delicious bottles of wine I ever had was a bottle of Louis Martini Cabernet Sauvignon. While there’s nothing wrong with that wine, I recall it as being utter ambrosia. But then, I was falling in love at the time, and the sky was bluer, the air was fresher, and I was the person I always wished I could be at that moment.
We can all take a bit of wisdom away from experience versus actuality: it’s always good to be mindful of what we eat and drink of itself, and to be present at every moment of our lives. As the sage once said, “Life moves pretty fast. If you don’t stop and look around once in a while, you could miss it.”
Step three and step four kind of run together, so I’m blogging about both of them at once. When we last left our Master Vintner Small Batch wines (Chardonnay, Merlot, Cabernet Sauvignon and Pinot Noir) they were resting comfortably in secondary fermentation. The next step was to . . . READ THE INSTRUCTIONS!
Yes, I keep coming back to the importance of reading. It’s your guarantee of success! A quick read-through let me know that I would have to check the specific gravity and then rack the wine from the secondary to the Little Big Mouth Bubbler again for stirring and fining/stabilizing additions.
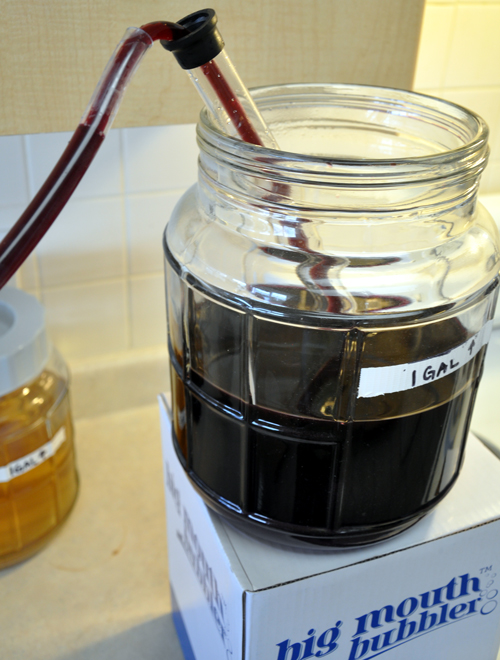
I sanitized all of my equipment, took a specific gravity reading (0.992 and rock steady) and then transferred the wine from the jug to the LBMB.
Auto-syphon: how do you live without one?
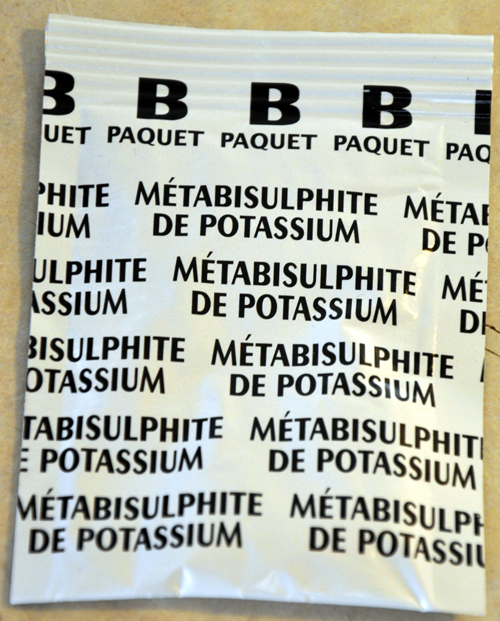
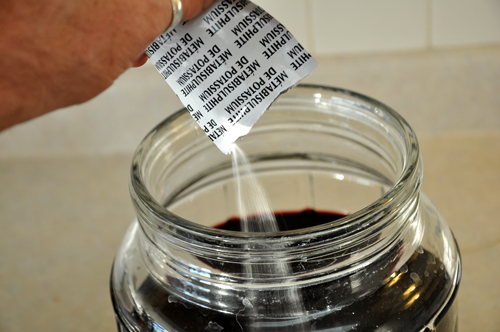
Once all of the wine was transferred over (leaving very little behind in the jug–less than a couple of tablespoons of goo) the next step was to add metabisulphite to prevent oxidation (browning and loss of flavour) and prevent bacterial spoilage (going icky).
Sulphite is your friend, and wants you to be happy.
Let’s talk about sulphite. It’s one of the most common food additives in use today, and it’s been in continuous use in winemaking for many centuries. It’s in every preserved food you buy and in lots of things you wouldn’t expect (noodles? Check. Frozen orange juice? You bet! Pancake syrup? Sure!) It’s safe and almost completely benign. If you don’t believe me, check out the world’s #1 Authority on sulphite use in home winemaking.
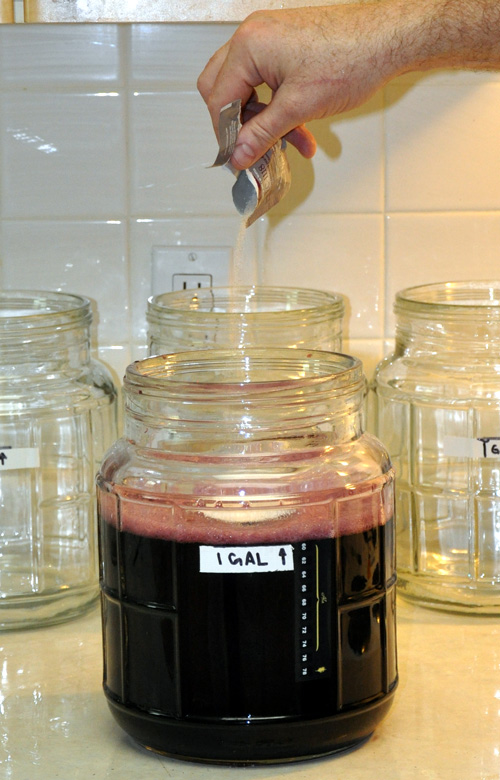
So that’s sulphite taken care of. In it goes!
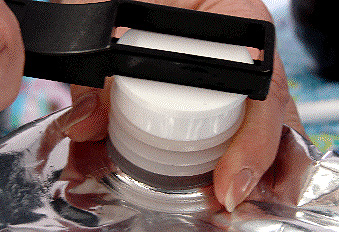
Be sure to tap the packet: a bit of the powder can get caught in the corners.
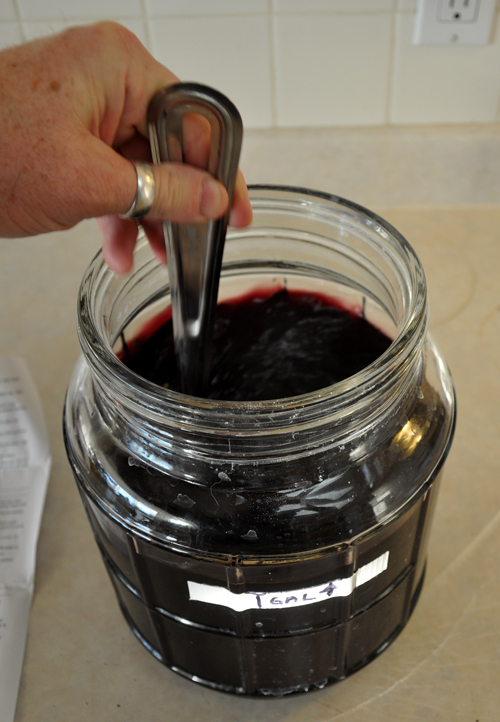
After the sulphite is in we have to stir the wine to distribute it, and to drive off gas in solution. This is crucial to the success of the kit. Carbon dioxide gas is produced by the yeast during fermentation. In a commercial winery this is not much of an issue because they take one or two years to get the wine ready for bottling, and in that time all of the gas escapes. Master Vintner kits are designed to be ready to bottle in just four weeks, so the gas has only a short time to escape from the wine. To stay on schedule we need to aid the process through mechanical agitation.
A stirring experience.
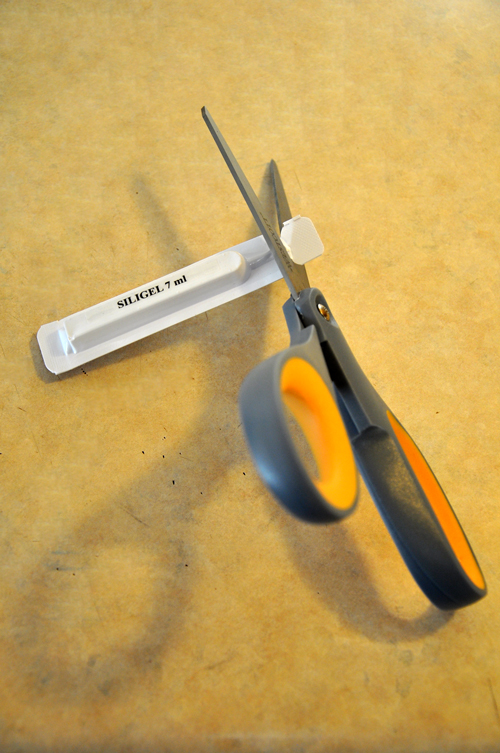
I stirred the wine for a full sixty seconds and then added the first fining agent. Fining is the process of dropping suspended material out of the wine so it’s clear enough for bottling and drinking. Common fining agents are either mineral in nature (Bentonite, Silicon dioxide) or a colloid/gelatine (Isinglass, Chitosan) and in wine kits they’re often used in pairs. The instructions say to add the packet labeled ‘Siligel’, a silicon dioxide solution–essentially really finely pulverised beach sand in a liquid and then stir again.
Sharp scissors are an essential winemaking tool
Cut the tip off of the Siligel packet . . .
Squeeze!
. . . and then another sixty seconds of stirring.
That’s what good stirring looks like–get the fizz out.
I popped the lid, bung and airlock on again and over the course of the next two days I kept my spoon in handy and stirred the wine again for sixty seconds at breakfast, lunch and dinner–since it’s right in my kitchen it’s an easy step to take right there when you’re already making a sandwich or preparing your Sunday roast.
After two days of stirring it was time to go on to Step Four, Stabilizing and Clearing. Since it’s almost exactly like the last step, I’m putting it all into this one long post to keep things clear.
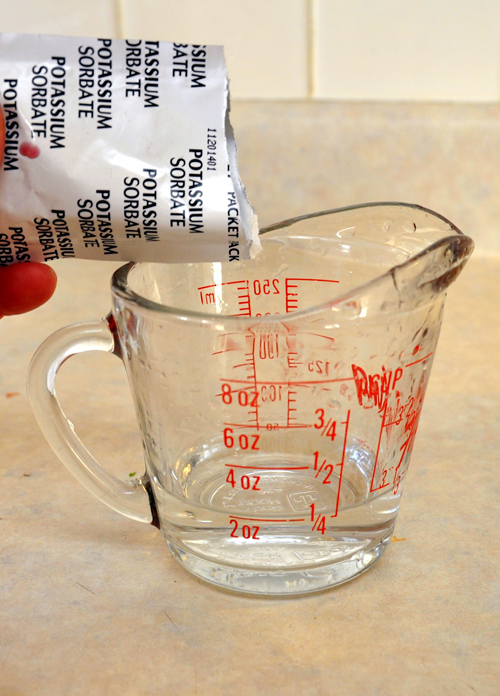
I cleaned and sanitised all of my equipment, checked my specific gravity (yep, still 0.992) and did my next addition, Potassium Sorbate. Sorbate is a bacterial suppressant. It doesn’t kill or even annoy spoilage organisms, but rather keeps them from breeding, which is crucial to the whole process of fining and stabilising: you use sulphite to stun/kill some of the yeast and any other organisms, you use the fining agents to sweep all of the micro-organisms out of the wine, and then you use sorbate to keep any of them from breeding back to the point where they can affect the appearance or flavour/taste of the wine. Sorbate is used in a lot of foods, condiments and even in beauty products and health food supplements, and is found in some berries (blueberries and Mountain Ash) as well. So, in it goes, with the first step being to dissolve it in a tiny amount of warm water.
It’s a teeny amount and it dissolves almost instantly.
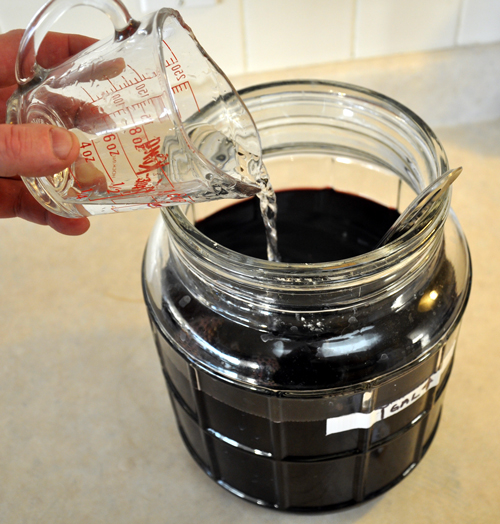
And then to stir that into the wine.
Everybody in the pool!
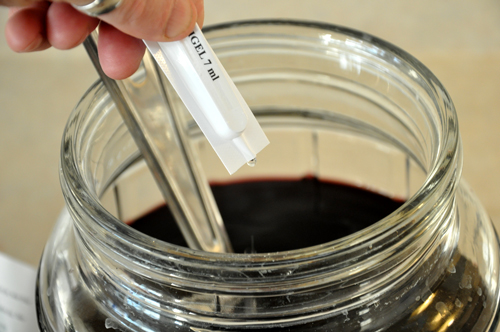
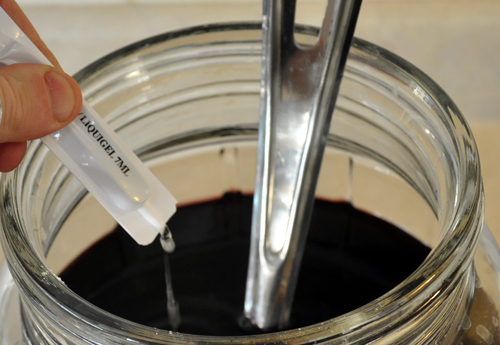
Next step is to add the ‘liquigel’, a clever contraction of ‘liquid gelatine’ and the final fining agent.
Snip!
Squirt in carefully.
It’s pretty sticky: make sure it all comes out of the packet.
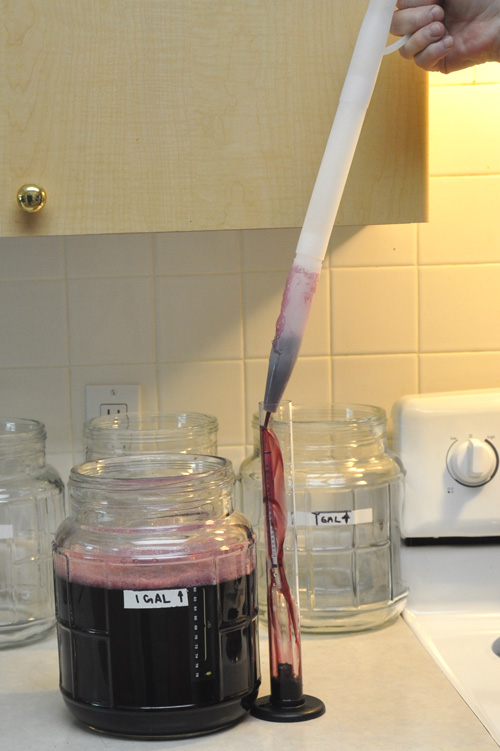
Once everything is stirred up and all additions are done we need to top up the wine to the one gallon mark again. Don’t worry about diluting it: if you’ve been racking correctly you’ll be adding less than a cup and a half (350 ml) and the kit is actually formulated to accommodate this extra water.
Topped right up.
After that it’s back on with all of the lids and airlocks and onto the counter to rest for six days until the wine is clear.
Soon, my pretties . . .
So far this has been the easiest, smoothest winemaking I’ve ever done: the one-gallon size makes doing one kit so easy, so quick, and so simple that doing three more at the same time doesn’t feel like work at all–it feels like a fun hobby leading to a great end–wine!
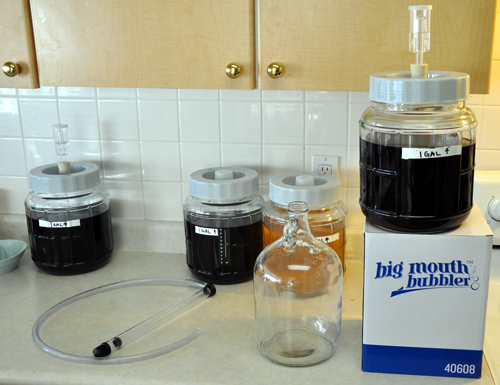
US Oh Little Big Mouth, you so tiny! Shmutz around the jug is yeast residue.
One of the cool things about the Master Vintner Small Batch kit is the size. Compared to lugging 6 US-gallon (23 litre) carboys around, the Little Big Mouth fermenter is a breeze. I’m a big, strong brute, but even I get twinges in my lower back when I have four or five full-sized carboys to lift up for racking.
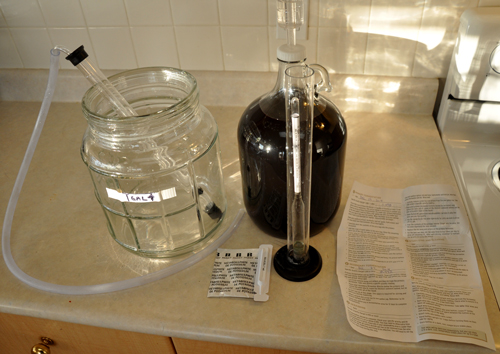
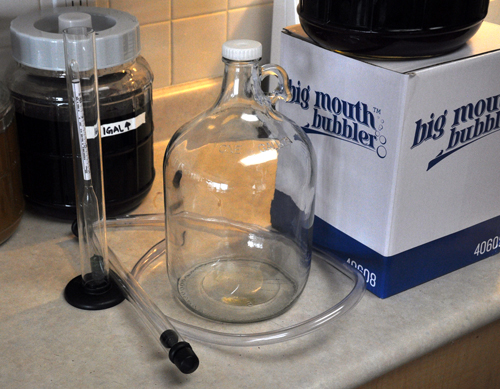
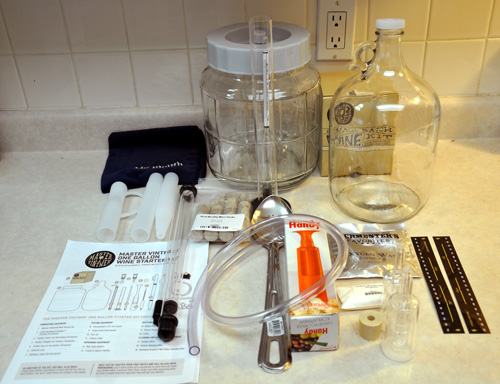
Autosiphon with tubing, hydrometer and test jar, 1 gallon jug and cap.
First things first: I assembled my equipment and double-checked the instructions. Yes, I wrote them, but I’ve become slightly obsessive about double-checking them for accuracy. I’m the only guy I know who can argue with himself about following instructions that he wrote!
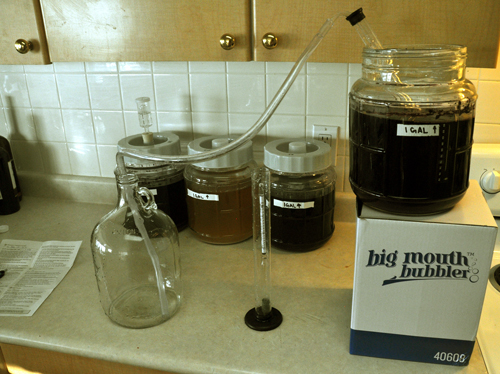
Not only are the Small Batch kits easy to lift, you can also place them just about anywhere. Rather than having to rack from a primary fermenter sitting on the counter to a carboy down to the floor, I popped the LBM onto a box on my countertop and put the jug beside it. I love working at counter height! Honestly, this has got to be one of the killer sell features of this kit: light weight, ease-of-use and dead simple, too.
If you’ve never seen an Autosyphon in action, the small version that came with the kit is a great piece of hardware. Plain syphons work fine, but you have to start them either by filling them with water, covering both ends and simultaneously plunging the pick-up rod into the wine and the hose into a bucket to catch the extra water, and then swap when the wine comes through, or by sticking them into the wine and sucking on the hose like you’re stealing gasoline from a car–which is a little unsettling, but sometimes an opportunity to ‘accidentally’ drink from the hose (wine, not gasoline).
Check out the Autosyphon action:
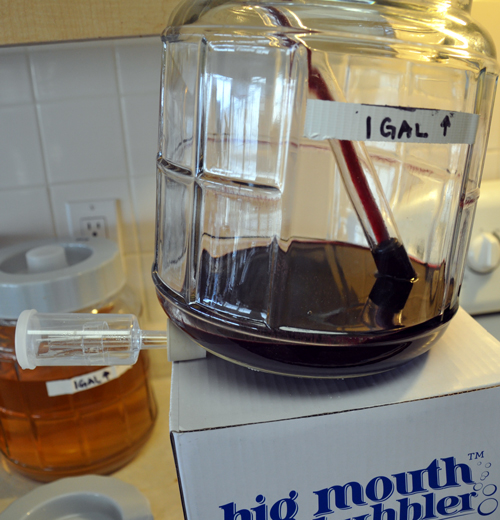
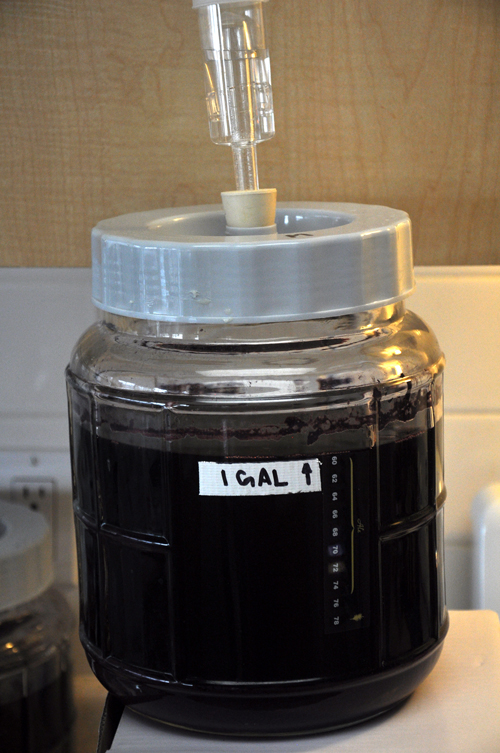
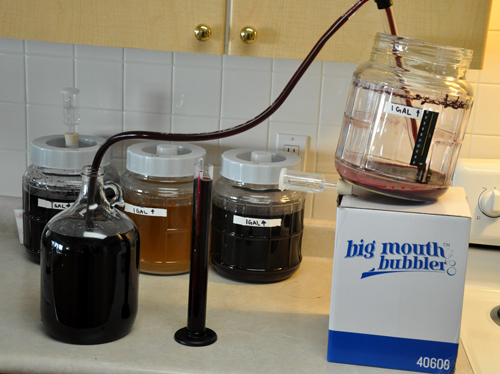
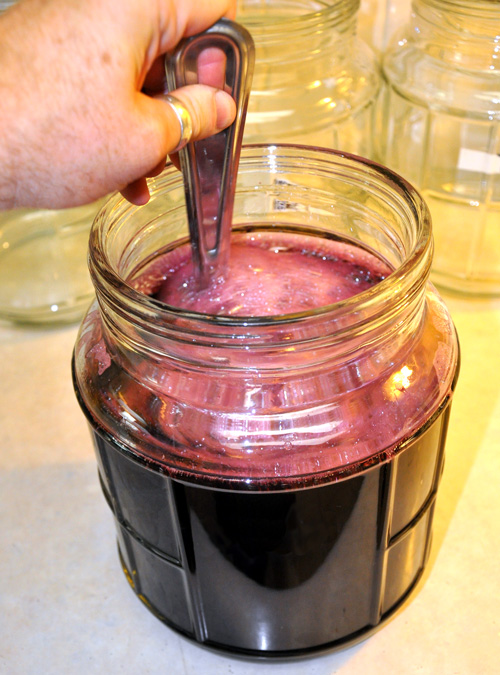
While the Autosyphon took care of racking the wine into the gallon jug, I did two more things. First, I deftly filled my hydrometer jar with wine so I could check the specific gravity, and second, I tilted the Little Big Mouth back towards the side of the jug that the syphon tip was in. Tilting it would allow me to get all of the liquid out of the jug, while the anti-sediment tip on the syphon prevented any yeast-goo from going into the jug.
Rack, because that’s how we roll.
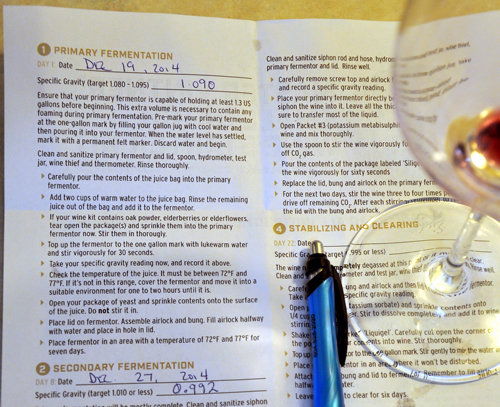
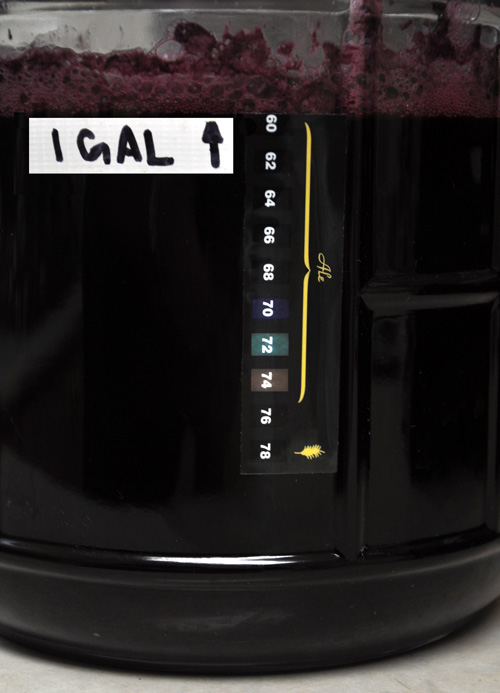
Checking the hydrometer reading, I saw that it was good.
Remember, look across the surface of the wine, not the edge where it touches the glass.
The reading was 0.992–my wine was finished fermenting. Time to look at the instructions, where I wrote down the gravity from day one.
Every word, poetry.
We started at 1.090 and finished at 0.992. With a little math, we subtract the finishing gravity from the beginning, multiply by 131 and we get 1.090 – .992 = 0.98 and 0.98 x 131 = 12.838, or just shy of 13% alcohol, perfect for our Merlot.
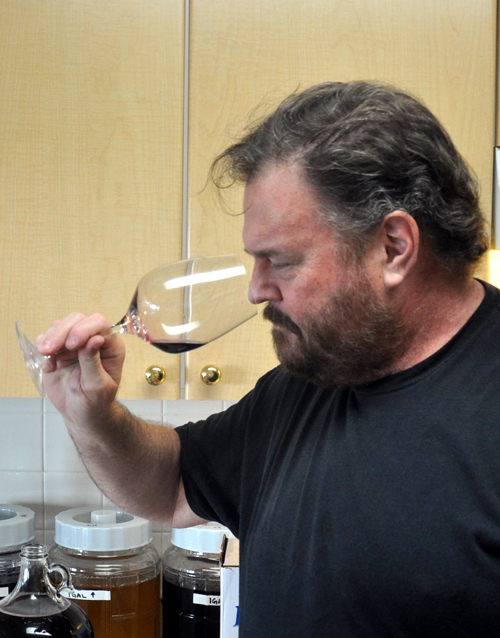
Of course there was also the necessity for a quality control test.
The moment of truth . . .
Smelled young, but very good, with nice dark cherry notes. As for the taste . . .
I’d say he’s happy. Or getting tasered. One of the two.
The taste was impressive for such a young sample–it’s going to be pretty good!
The last thing to do was to put the cap an airlock onto the jug and clean up all the equipment I used–well, after I finished racking the other three wines!
Oh little wine jug how I love thee! Note the small amount of fizz–that’s CO2 gassing off, not fermentation.
I’m sold. It’s one thing to develop a kit in the laboratory and taste bench samples, but it’s another (and completely necessary) thing to do it right in your own kitchen, among the cats and cabbage rolls to see how it’s going to work in the real world. I’m happier with this kit than with anything I’ve done in a long time, and in 12 days I’m going to get it stabilising and cleared and then it’s off to bottling. Hurrah!
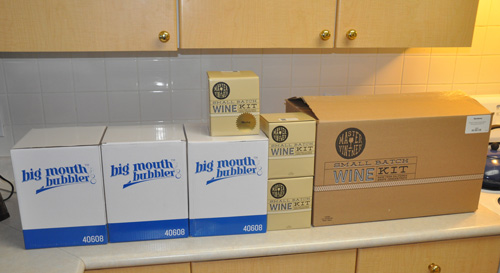
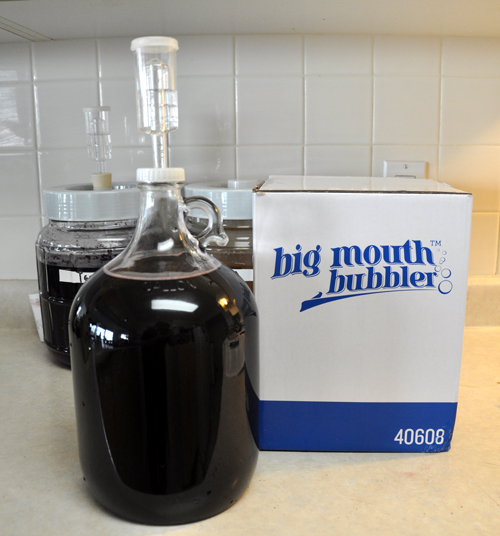
One full equipment kit, three extra Big Mouth Bubblers and three extra wine kits!
How happy am I? I’m ecstatic! How proud am I of the Master Vintner project? So proud that I put my name right on the box!
My mother is so proud!
I’ve been working with my friends at Northern Brewer for the last year to make this happen. It’s been an amazing time, and a lot of fun working with the crew there. Designing a new wine kit might seem easy at first blush. After all it’s just a matter of putting some stuff in a box and a bag of grape juice and away you go.
Only not really: there’s a lot of logistical and technical issues that need to be solved. Ordering grape materials has to precede the harvest by months in order to ensure you get the best of the vineyard. Then you need to formulate, get the juices cold stabilised and ready to blend, make and test blends (like all wineries, kit manufacturers blend for character and consistency) and then test your packaging protocols to make sure they will arrive to customers in good condition.
Beyond that, it’s a whole new world of equipment, specific to the 1 US-gallon size, that needs to be integrated to make sure it works well together and makes the best wine possible. Lucky for me there’s a great team doing the sourcing and manufacturing, making me look good!
It’s like a treasure chest for winemakers
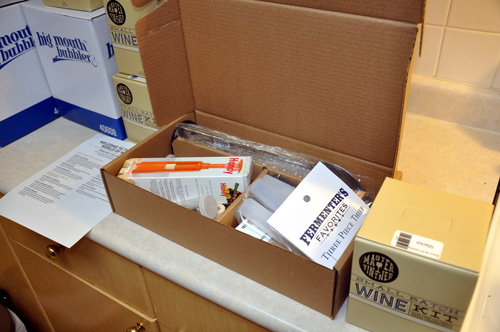
My Master Vintner equipment and supplies arrived this week and I got cracking right away. Step one, unbox and check the contents.
All present and accounted for!
The equipment kit contains almost everything you need to make a one US-gallon (5-bottle) batch of wine. You’ll have to supply the wine bottles, which can be saved from the recycling (hurrah environment!) and labels, which are fun to make for yourself.
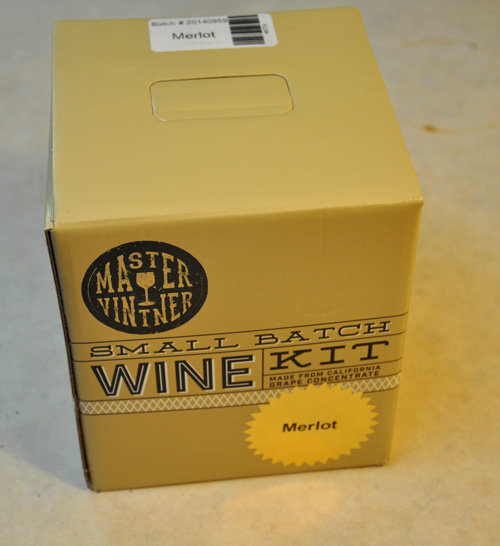
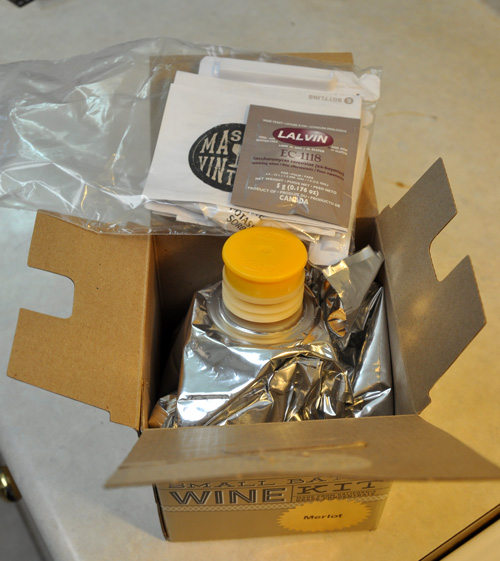
The first step is to read the equipment list, make sure everything is there–pretty much a sure thing from Northern Brewer. Next, we need to pull out our wine kit and check out that puppy. The first one I laid hands on was a Merlot.
Small package? Good thing!
California Merlot is going to be rich and soft, with warm berry and dark cherry fruit and supple tannins. Mmm!
Next, let’s take a look at the ingredients, and most especially the instructions.
The good stuff
The wine kit has yeast, finings, stabilisers and a fabulous set of well-written and lucid instructions (yes, I wrote them).
Hi-yo Mylar! It’s shiny, but I’m more interested in those brilliant instructions
I dove into making the kit immediately, but that’s only because I wrote (and re-wrote, and edited and re-wrote) the instructions myself. Everyone else should immediately put everything back in the box, seal it up and sit down and carefully and slowly read the instructions from beginning to end–if you’re not sure of anything, don’t start until you get it straight!
But don’t worry about that too much: ultimately, if you can make a cup of coffee or a bowl of cereal, you’re qualified to make your first batch of wine without any problem–I promise.
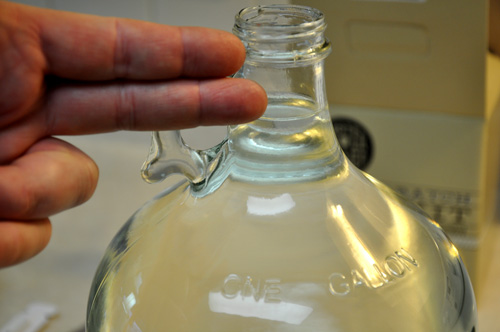
After reading the instructions, the first step is to mark off Little Big Mouth at the one-gallon line. LBM’s aren’t pre-marked because it’s a tricky process, and some folk’s jugs might not be completely standard, or the markings might get altered in shipping and handling. Better to do it in your own winemaking area so you’re confident you’ve got it right.
The best way to do it is to fill your gallon jug right up to the neck, about two fingers below the tippy-top.
Any fingers will do: mine are fat, but skinny fingers work equally well.
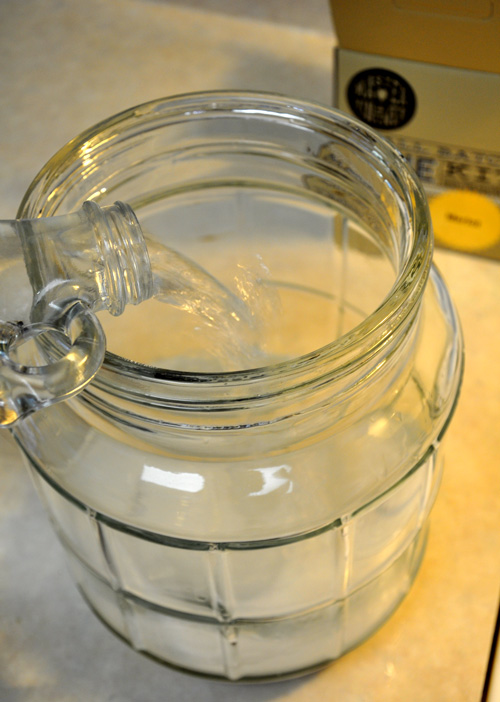
You then pour the jug into your LBM.
Note the water mixing with Oxygen Cleanser in the bottom of the LBM.
Because the next step is to get things clean and sanitised (cleanliness is next to goodliness for winemaking), I put my winemaking cleaner right into the LBM, to save a step. The Oxygen Cleanser included in the equipment kit a great product–you can’t use home cleaners because they have too much perfume and other weird chemicals, which can leach into the wine and leave strange flavours.
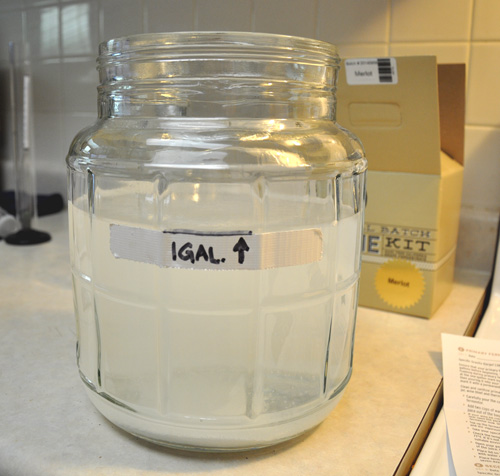
Next step is to mark off the 1-gallon level. I used some white Duct Tape and a permanent marker.
That’s the spot.
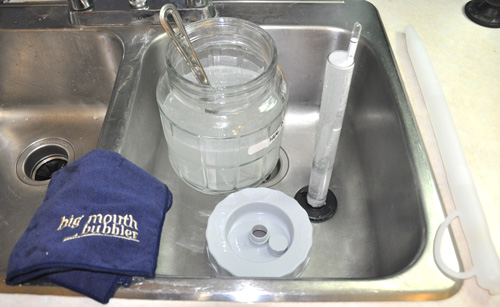
And then it’s into the sink with the other items needed for day one: hydrometer and test jar, wine thief, lid, spoon, bung and airlock.
Scrubbing and soaking, the Tim Vandergrift way
While the equipment comes brand-new, so it’s not stained or dirty, it’s still a good idea to give it a very good cleaning before you use it–just like you would any new plates, glasses or cups you brought into your kitchen.
After a 20 minute soak and a scrub to remove all surface debris, I rinsed everything thoroughly and then sanitised with a metabisulphite solution.
Now that’s a product shot
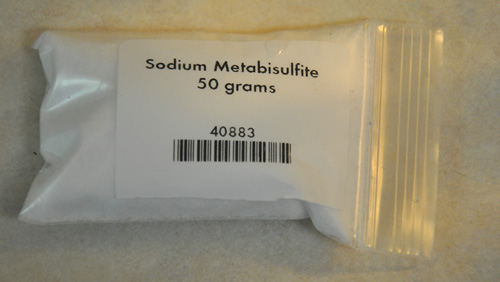
Metabisulphite solutions are the second part of cleaning and sanitising. While Oxygen Cleanser leaves your equipment clean enough to eat off of, it’s not ready to use for winemaking. For that you need to treat the surfaces with a solution that will suppress bacterial activity, and in winemaking the easiest stuff to use is a solution of three tablespoons (50 grams) of crystalline sulphite powder in 4 litres (one gallon) of water. Note that absolute accuracy isn’t crucial here, because you’re shooting for a solution that will yield 1250 Parts Per Million of free sulphite and the difference between one gallon and 4 litres or three tablespoons and 50 grams won’t move it more than a few dozen PPM.
I didn’t take any pictures of sulphiting the equipment because a) I didn’t know how to make that look exciting, and b) I always have a spray bottle of the stuff under the counter and I just grabbed it and sluiced everything down, waited 5 minutes and rinsed. By the time I remembered I was photoblogging I had already started the wine. Whoopsie. In any case, I went on to the next step, grabbing the bag of winemaking concentrate.
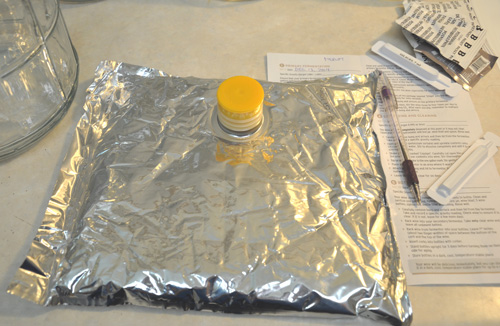
Grey and wrinkled, but still has a sparkle, like the winemaker
The caps on these bags fit extremely tight–they have to to exclude oxygen and spoilage organisms. If you’ve got long fingernails, or issues with grip strength (which is to say, if you’re not built like an ogre like me) you can pry them up with the edge of a butter knife (nothing sharp, please!) or use a bottle opener on the edge (works like a charm) or invest in a bag decapper. This doohickey fits exactly over the standard cap and levers it off in a jiffy.
Works like a charm, and saves that manicure
Fortunately for me, I am built like an economy-version ogre, so I just pull it straight off. I am also good with opening pickle jars and other applications of brute-force and ignorance.
Yoink!
Careful, though: the juice is very high in sugar and red varietals can really stain fabrics–easy does it.
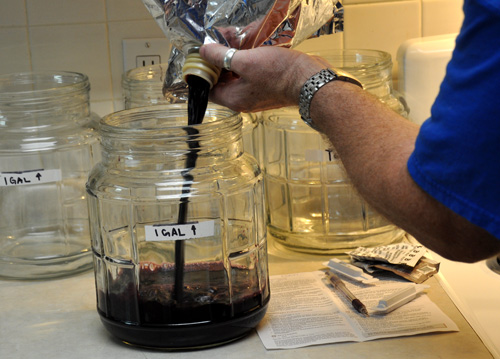
Next, pour the bag contents into the LBM.
Smells fantastic.
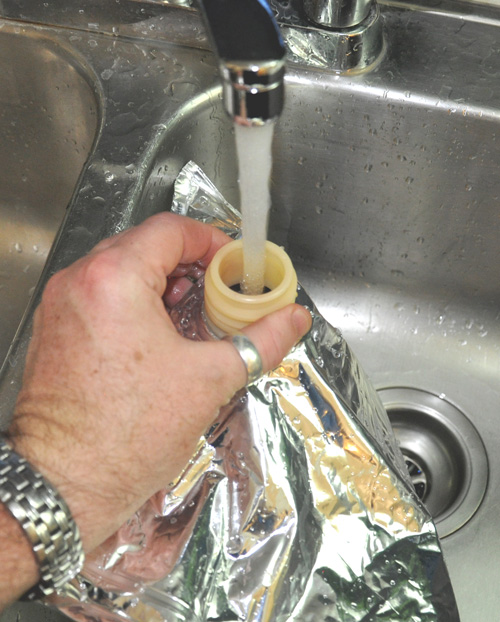
Rinse the bag out with two cups of lukewarm water and add it to the LBM as well.
Good to the last drop.
An important word on temperature: the kit has to be between 72°F and 77°F (22°C and 25°C for non-Americans). This is crucial for the success of the kit, because the yeast need to get fermenting quickly so your wine can stay on schedule. That means a bit of management: if the kit is coming in from a cold garage you’ll need a bit warmer water to make it up. If you’re in a heat wave in Florida, you’ll need to cool that water down a bit.
But it’s not terribly tricky. To hit my target temperature I ran the water in my sink for a minute until it hit 77°F and topped up the fermenter to the 1 gallon mark with that. When it was at the right level, it was time to stir.
Stir like it’s 1999.
You have to stir hard. Pouring the water into the juice makes it look like everything is well mixed, but that’s an illusion: concentrate and water have very different coefficients of viscosity and left to themselves, they’ll settle out. I gave it a darn good whipping with the shiny stainless steel spoon that came with the kit.
Next up, some measurements. First, the temperature check. I pasted on the Fermometer on the LMB and had a look.
Looking good!
With the temperature well in hand, it was time to check the specific gravity. I assembled the three piece wine thief and used it to fill the test jar.
Fill ‘er up.
With the level of the wine relatively low, it takes about three trips with the thief to fill the test jar. When it was full enough to float the hydrometer I popped it in and checked it.
Sight along the surface of the wine–that’s where the reading is accurate.
If you’ve never read a hydrometer before, there’s a trick to it: don’t look at the wine where it meets the hydrometer. Surface tension will pull it up the glass tube and give a false reading. Instead, look across the surface of the juice and draw an imaginary line from that surface across the hydrometer markings. In this case it was a solid reading at 1.090–perfect.
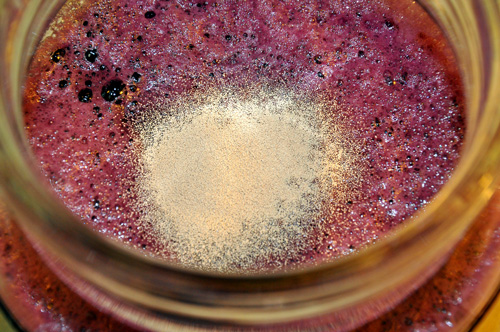
Next up, time to pitch the yeast. There’s a lot of information out there about rehydrating yeast and stirring it in and suchlike. For the Master Vintner wine kit, follow the instructions and just rip the package open and pour the yeast onto the surface of the juice.
As soon as the yeast goes in, the juice is considered to have become wine.Go my little yeasts! Be fruitful and multiply and make wine.
And that’s it for day one. The only thing left to do is to wait 8 days for the next step.
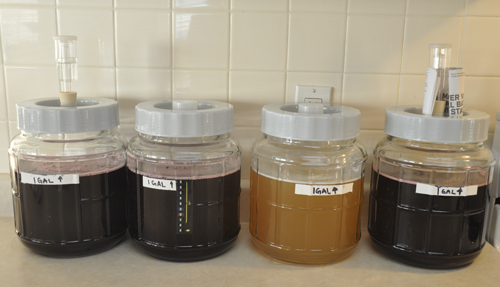
Well, not quite. I had three more kits to make up!
So beautiful, each in their own ways
I’ll update when it’s time to rack the wine from the LBM’s to the jugs. In the meantime they’re bubbling away merrily, making alcohol and smelling better every day. Yum!
I’m smiling because I’m in the middle of a factory that processes hops–reason enough for a lunatic’s grin.
It’s been a full month since I last blogged. But to my defense, I’ve been a bit busy. In addition to my partnership with Midwest Supplies and our cool new Master Vintner line of winemaking products, I’ve been busy doing a few other things. First, I shot some videos:
And then I did a little bit of travelling. Since the end of August I’ve been to:
Minneapolis
Houston
Atlanta
Victoria
Denver
Seattle
Yakima
Boston
Virginia
Philadelphia
Minneapolis (again!)
Detroit
Chicago
Kelowna
Summerland
In that time I’ve been to Hop and Brew School, done wine opportunity seminars for consumer beverage retailers, Limited Edition wine and food pairing events, shot many videos, attended the Great Canadian Beer Festival, helped plan catalogues, merchandised stores, drank beer and laughed a lot.
And now I’m typing this up in an airport lounge waiting to jet off to Winnipeg. I’ve had some exceptionally good luck with local weather on my travels, and had a lot of fun working with my friends in all of the cities I’ve visited, and I’m looking forward to the same over the next week.
I’ve got three or four blogs lined up, and soon I’ll have some very exciting news to share, but that’ll have to wait another few days: I’ve got some sales training to do, another couple of Limited Edition wine tastings and a webinar session for the members of the Canadian Craft Winemakers Association.
I can’t remember why I was so mad at that wine glass . . .
The big news is finally here! Midwest Supplies and Tim Vandergrift are working together! I’m really happy with the fit between us and excited to introduce new products and to work on advancing home winemaking. I became an independent consultant early in 2014. My biggest concern about my new career was where I could apply myself to make a difference in the consumer-produced beverage industry (aka Homebrewing and Winemaking).
While I connected with many small clients and really love the interaction I have with them, I looked around and realised that one of the most dynamic and exciting places in the industry was right in front of me, Midwest Supplies. I’ve worked with them for more than a decade on behalf of Winexpert and always loved how they ‘got’ the industry, understood home beer and winemakers, and generally felt they were my kind of folks. Of course, this didn’t keep me from thinking that they could probably use a guiding hand on the wine side, but I always had other priorities. Now that I’m their Technical Winemaking Advisor I feel incredibly fortunate to have the opportunity to work with them to introduce some new ideas to home winemaking and do educational and promotional activities as well. I’ve even got a couple of videos up to start, one on the benefits of using a floor corker,
And one on the savage joy of using a three-pronged stirring whip! The Great! Big! Deal! that I’m really happy about is some of the new products we’ll be bringing out in the future. No hints just yet, but I’m pretty stoked about sharing them, and won’t hide that light under a bushel. If you’re already a Midwest customer, thanks! If you’re not yet, check ‘em out, and check out My Ten Favorite Wine Kits—nine of which are on sale for a limited time! Use the secret coupon code (hint: it’s WINEGURU) at checkout and you’ll save 15%. How’s that for a hello? Lots more to come, and so much to do, and I couldn’t be happier or more proud.